- Home
- Education
- Photography and Digital Art
- Live Studio Photoshop
Today's class is "The Secrets of Photoshop....revealed!!!!" Or something....equally as mysterious and thought provoking.
My teaching assistant Mr. Hand will be here to help out also.
In response to your Photoshop questions in the EBSQ forum, I see that people want to know about, paths, channels, filters, layers, Masks, text, and I think someone asked about sausage making. K....that was me.
From what I gathered there also seems to be a mixed bag as far as peoples abilities in Photoshop. So I'm going to run by the basics quickly.....some of the basics intermingle with the other questions you have.
Ideally, if all of you had Photoshop, and I could teach at the same time, this would be much easier. I think the best bet tonight, is just listen to me, grab what you can, and know that it will be in Zine later, where you can try it out at your leisure. Please save your questions till the end.....well...unless you have to potty...then just go do it.
For those of you have Photoshop, or Elements, or Photoshop Light, and want to work with me, please do. However, I'm unsure if Elements or Light offers the same functionality of what we are covering.
I'll wait a moment for those who want to open up their software. Behave Joe.....gotcha.
Step 1) (Photoshop is my friend)
Repeat after me.....Photoshop is my friend, and someday we hope to be married. Good.
Step 2) Part Two: PATHS
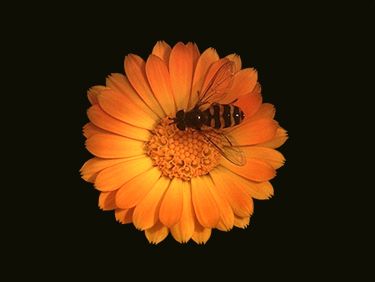
Here is a picture, right click on it and copy it.
Now pop over to our friend Photoshop. Click on "FILE" at the top of the page, now "NEW", a little radio box should pop up, just ignore it for now, and hit "OK". You should be left with a blank canvas. Now, go under "EDIT" at the top of the page, and hit âPASTE". ...and Shazam! You have successfully stolen an image.
I want to cover what "Paths" are......and yes they are kinda like narrow trails in the forest. But, to learn about paths we have to talk about selections first.
To put it simply, a selection is any part, or all a graphic that you may select. In Photoshop there is a number of ways to make a selection. Take a look at our flower bee pic again. For example lets say you want to take this flower out, (maybe to put it on a different picture.) You have to tell Photoshop what you want. You can either use the polygonal laso tool and manually go around the flower petals.....or a much easier solution is to use the magic wand tool! (plus it sounds cool) By clicking on the black portion of the graphic you have now selected it, however, our original intention was to select the flower. Go to the top of your screen and click "SELECT", then go to "INVERSE".
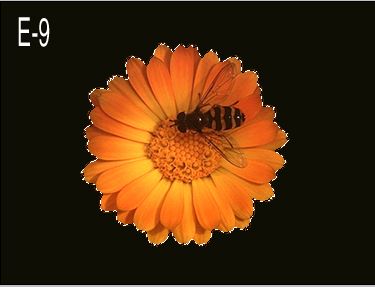
As you can see in this picture, the flower has been selected, people have also called this the "marching ants" because the selection dashes flicker and it looks like ants....that are...k...you got it.
Now you know what a selection is we will move on to Paths. What are paths? Why would you want them? And what would you do with them?
A Path is a selection outline that has been made permanent, in case you need to use it again later. See?...that was simple.
Why would you want to save a selection as a path? Some selections are had to make. I used an easy picture to perform a selection on. If you wanted more control over your selection...and did it manually...for example...it may take you a few minutes....or longer....depending upon how much care and effort you put into it. Then, if you should happen to click outside that perfect selection you spent some time on creating....it will disappear....poof....just like that. For that reason you may want to consider saving your selection as a path.
Lets pop over to: our Paths pallet.

(Hi Mr. Hand)
If you don't see all your palettes go up to the top of your screen to "WINDOW"....then zip down till you find "RESET PALETTE LOCATIONS". Click it, and you will be met with a nice orderly...yet confusing set of palettes...all designed to enrich your life and make you breath easier. Now look for the palette tab that says "PATHS". (Yes, this is what you have been looking for.....feel the love)
To convert a selection to a path....go to the bottom of that palette and look for the icon that says, "Makes work path from selection". Now press it.

You can also see the magical dancing dashes around your selection have now become a solid line. You can convert it back anytime when you are done with it to a "selection outline", by pressing the icon that says "Loads path as a selection". Don't you feel so smart now? You will go a long way baby.
(STEP 3) Masks.
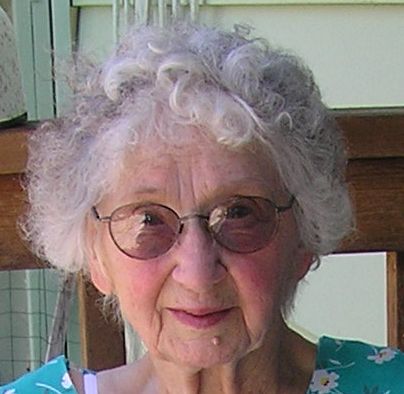
What is a mask? (subtitled: Selecting Grandma)
(first close up your flower bee picture)
You may already be familiar with what a mask is. In Photoshop it serves the same purpose.
First of all, a mask is yet another type of selection tool. It allows you to work on one area of your image without screwing up another part of it. (Those are the "technical" words)
Why would you want to use a mask? A mask is another permanent means of selection that you can save
for later and use again. You can also achieve a much better selection outline by using them. Lets say for example:
1) You have a taken a picture of Grandma and she was having a very bad hair day.
2) In the background of the picture, unbeknownst to anybody at the time, was little Johnny, mooning the camera.
3) You think this picture of Grandma would make a nice Christmas card.
4)But without little Johnny, and his amazing powers of timing.
(For those following along, please take the necessary steps to open Grandma up in Photoshop) (R click on pic. Hit COPY. Go to Photoshop, go to FILE (at top of page), go to NEW, hit OK, go to EDIT (at top of page again) go to PASTE.....and Shazam! Grandma magically appears.
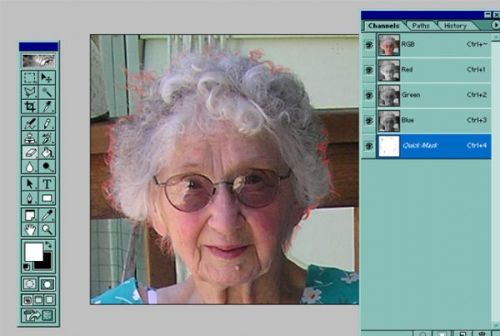
For this exercise you will also need to view your CHANNELS palette. If you do not see it, go to WINDOW (at the top of the screen) then zip down to SHOW CHANNELS.
So, you have to find the best way of selecting Grandma in the picture. Because Grandma was having a bad
hair day, her little gray hairs were all over the place. And remember when selecting Grandma, it is always wise to keep all the hair on her head. Otherwise.....she will look like she's had part of her head shaved....and that will not make for a very merry Christmas card.
First you must enter "Quick Mask Mode"....don't worry its painless. Go to your handy dandy oblong tools palette.
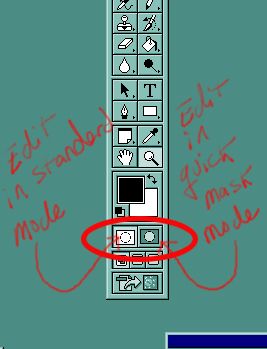
You see the two icons, side by side, that look like a circle inside a square. (or the Japanese flag) The button on the left allows you to edit in standard mode, which you are in now. The button on the right will allow you to enter..."Quick Mask Mode". K.....be ready, click the "Quick Mask Mode Button" Ooooh!!!
Doesn't that feel good?
As soon as you enter Quick Mask Mode, you will immediately notice that nothing has changed....at least not to much on the outside. Quick Mask Mode is more like a state of mind. If you look at your CHANNELS palette you will notice a new category has been offered. (We will talk about your Channels palette later) You will see a category that says "QUICK MASK".
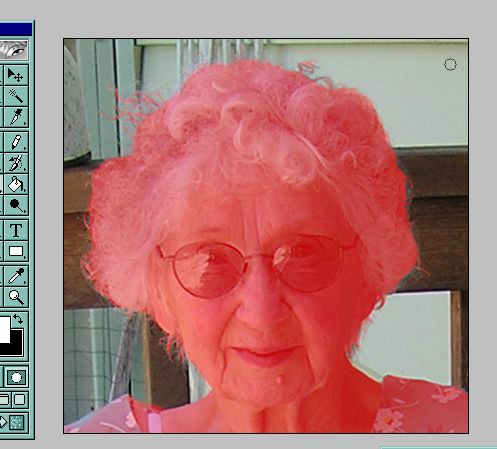
Ok, now....prepare yourself. Go to your oblong tools palette and click on your friend "the eraser tool". By adjusting your eraser size to the smallest size available. (look for the word BRUSH at the top left of your screen, click on the number to the right of that, now set your brush size to "1".) Begin, by brushing over the fine hairs on grandmas head with the eraser tool.....little red lines should appear.
Once you have finished with the smaller lines, begin blocking in other parts of her face with a bigger brush size.

Till at last, grandma's face is all red.
If you go back and toggle between the "Edit in Standard Mode/Edit in Quick Mask Mode" buttons, you will see that the mask also turns into a fancy pantsy detailed selection. (Grandma will have marching ants all around her, won't she like that) ?
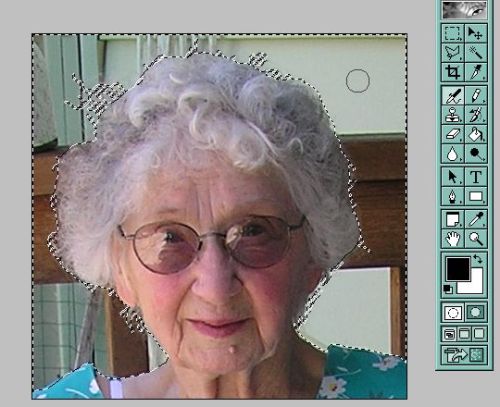
By using the quick mask mode of selecting an item, you can pick up much greater detail than you could by using the magic wand.
What can you do now that you've accomplished this? Without going to into to much detail...you can:
In a nutshell, you can paint, draw, filter, clear or do virtually anything to your picture without disturbing any part of your graphic within the layer mask.
There is so much more I could go into about Masks and Selections but because of time purposes I want to move on to other things.
STEP 4 The Channels Palette.
The channels palette provides a place to view the components that make up a complex image, such as color components, etc. In addition, channels are a good place to store mask information permanently. (such as the Quick Masks, as you just found out)
The channels palette is almost obsolete now, in earlier versions of Photoshop (prior to PS 3) LAYERS did not exist, and this was one of uses for the palette. What are layers? Hopefully you already know, if not, we will save that for another time, another place...(hopefully France)
To save you from a boring topic where I'm sure you would prefer to die a slow painful death. I will just hit the highlights of the CHANNEL PALETTE.

If you don't see your CHANNEL PALETTE, go to the top of your screen, click on WINDOW, go down to SHOW CHANNELS.
If you still have Grandma up in PS. You'll note, that when working on an RGB image, that the channels have been broken down as such. By clicking individually on each function R (red) G (green) or B (blue) it will show you how much of that particular color information is making up your image.
You can also edit specifically on only one of these three colors, if you choose. Which, depending on your image, might make things quite easy, if say for example you only want to edit one of the three main colors (or any color that falls within that spectrum) of your image.
Also, another handy feature of editing in RGB mode, is that sometimes, when you're working on a scanned image. It is easier to isolate those little scan lines, or glitches from scanning, because they fall primarily on only one of the color channels. (or so I'm told)
Ok, are you dead yet? If so, please pick yourself up off the floor. Now wrap your arms around yourself and give yourself a big hug. Now whisper something meaningfully to yourself. (Your choice. If you include the words "Forever" and "Visceral"......you will really enjoy it)
Step 5) Lets have some fun with Filters! Yeah!!!!!!
Lets pop our bee and flower image back up in Photoshop if you have it handy....oh close up Grandma, she's tired now.
In order to have fun with filers, first we need to.......what's that magic word we've been discussing all night? SELECT!!!! We need to select the part of the image we want to filter....although you could filter the entire image as well. I thought this would be a nice tie-in to my previous blabbing. (ty Joe, yw)
K....if you have the flower bee image up on Photoshop, grab your magic wand tool. (behave Joe) and touch anywhere on the black portion of the image. K.....you have now selected everything except the flower......however we want to mess with the flower. So, go to SELECT (at top of page) go down to INVERSE...click it. Now you have selected the flower. Cool huh...
Let the fun begin!!!! Go up to FILTER (at the top of the page) Pick any filter you want and just screw around, the best way to learn about these is just by playing.
I will cover the basics quickly, and these are my preferences.
Note: When applying a filter and should you decide that you don't like it. Go under EDIT (at the top of your screen) and hit UNDO.........
BLUR: I use Gaussian blur the most. It allows me to set the radius and experiment with how much blur I want to add.
(see blur pic)
SHARPEN: I always use the Unsharp Mask option as opposed to the others. I won't explain why they call it that. Once again, the Unsharp Mask gives you parameters that you can manually set yourself.
Please feel free to experiment with the other filters when you have time, most of them will give you options for further tweaking control.
But for now, lets try something wicked.
If you still have your flower selected.
1) Go to FILTERS (at top of screen) go to SHARPEN, go to UNSHARP MASK.
Set the following parameters.
Amount 166
Radius 3.3
Threshold 0
Click OK
(you will see a much sharper image of the picture)
Now, go back up to FILTERS again. This time go down to ARTISTIC, go to PLASTIC WRAP. Set the following parameters.
Highlight strength 15
Detail 9
Smoothness 7
You should have something that looks like this:

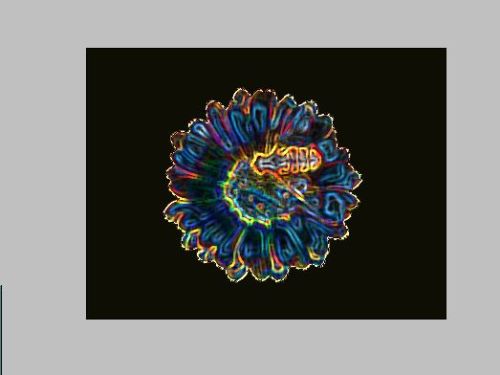
To really jazz it up....and cause a hippy to have a flashback...go back to FILTERS, (at top of page) go down to STYLIZE, go to GLOWING EDGES. Set the following parameters:
Edge width 2
Edge brightness 6
Smoothness 5
Hit OK....and look what you have done!!!!! Yes it's a psychedelic dream come true! Won't the hippy in your life just love you? Get out the hemp cuz, yes they will!!! (Practice saying the words groovy and trippy for extra credit)
There are also third party filters (also known as Plug-ins) that you can use also. They are designed to work in Photoshop and other image application software.
Here is a list of some of the other filters I use.
Eye Candy and Xenofex by Alien Skin Software
Paint Alchemy by Xaos
Assorted filters from Flaming Pear
A lot of times I will see the effect a filter has on something, then modify still further on my own.
There are literally zillions of things you can do with PS filters, filter combos, and third party filters. But my philosophy is, while these filters are a lot of fun to play with, you should also take the time and get to know them. (Sometimes they are a lot fun at parties)
STEP 5)
Tonight's final demonstration is about Text. Wait till you see how much fun you can have. Yes, you'll be slapping your knee, or your partner's knee shortly.
Do you still have that picture of the psychedelic flower. You do? good.
You must display your CHARACTER palette, if you don't see it on your screen, please go to WINDOW (at the top of the screen) Then zip down to SHOW CHARACTER.

Now go over to your oblong tool palette and click on the TEXT TOOL icon. Move your cursor over to your picture, and type the words "groovy baby".

By going back to your CHARACTER Palette you are given many options, including the type of font, the size, the spacing size between the characters, the color of the font, and more, giving you complete control over your text. Don't be surprised if future versions of PS ask if you would like cheese to burger to go.
Ok, pick out a bright shiny font that you like....cuz as Emeril Lagasse says, "Were about to take it up another notch!"
This next trick is going to blow you off your feet. So when I show you....all I ask is that you remember me at Christmas time.
Lets have a look at your LAYERS palette. If you don't see it.....go to the top of your screen, click WINDOW, zip down the menu till you find âSHOW LAYERS".
Under you LAYERS PALETTE you should have to layers all ready in there. One is the image of the funky flower, the other is your text.
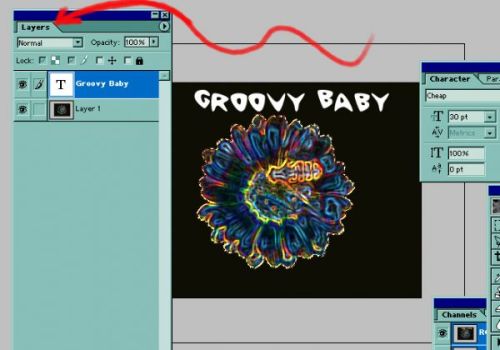
Now, put your cursor on the layer that says "Groovy Baby".....or whatever you typed. Start by clicking once on that layer, just to make sure it is the active layer. Now.....right click on that layer and a sneaky little menu pops up. (be still your beating heart) Pop down till you see the words BLENDING OPTIONS...click on it.
You should be met with a radio box titled LAYER STYLE, that is far to big for the screen, but none the less offers you a plethora of options.
Once again there are to many options to go into, but do yourself a favor, and check out the drop shadow, the bevel and emboss filters, the gradient overlay....and all of their parameters. If you can move the LAYER STYLE box in such a way as to view your graphic you will see that your font now reflects a preview of the filter you are applying.
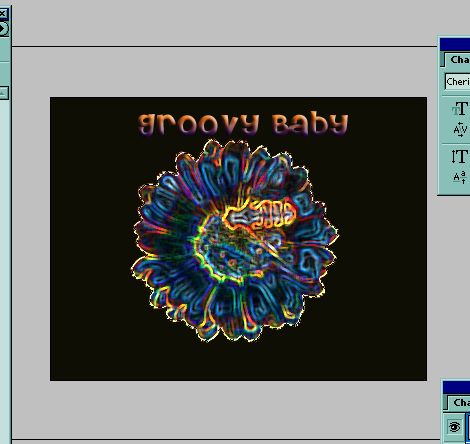
This is just a quicky thing I did, using the Bevel and Emboss filters, plus the gradient overlay filter. Note: you can also go back to your CHARACTER PALETTE after you've applied your filters and change the font as many times as you would like, and see how these filters look on different fonts.
For more Fun with Fonts, click on your TEXT TOOL icon on the tool palette, and if you look to the upper right hand of your screen you will see...
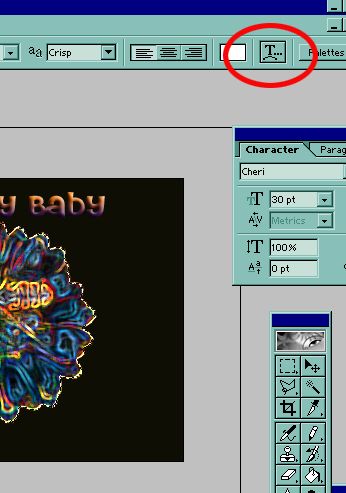
The font warp button.....go ahead...don't be afraid, click on it. Another little box will pop up called "WARP TEXT". For this I will set you on your own journey of beautiful self discovery.
But Looky what I did!!!!!!

Are you brains ready to explode with to much information yet? Are you so excited about Photoshop that you can't stand yourself? When you look in the mirror do you see a whole new you? Do you look so hot you would marry yourself? Yes, go ahead and say it..... "I am one hot hoochie mama...or hoochie daddy"......whichever one applies.
In conclusion. There isn't anything that can't be done in Photoshop. I hope this has been educational as well as entertaining.
