- Home
- Education
- Glass Stone Clay
- Live Studio Stained Glass I

From the EBSQ Live! Archives

Originally Presented 14 April 2002
Note: This article is image intensive--please be patient as pictures load.
There
are 2 basic methods of doing stained glass. The leaded method
and the copper foil method also known as the tiffany method. The
leaded windows are traditionally in churches and older homes.
Today I will be showing you a copper foil method as it is the
one most used in smaller items. Oh, there is one question I get
asked all the time and that is âhow do you color the glassâ? You
don't. Glass comes in several different colors.
First the tools you will need. This is just a picture of the items
you will need. I'm not providing a list of tools in the live chat
but this info will be available in the final transcripts. Grinder
not shown
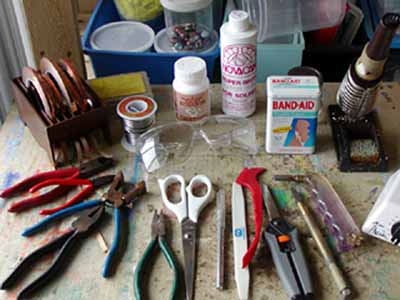
I want to mention that this is just the basic items that you will
need. There are other tools you could get in addition to these
but this will get you started. I also want to mention that this
is not an inexpensive hobby to take on. If you are not sure whether
this is something you want to do on a continuing basis, I recommend
you either buy your tools used or try to find someone you know
that will let you try it out before you purchase. The approximate
price for all the tools above if you were to purchase them new
would be between $250 and $300. These supplies are usually a one
time purchase and will last you several years. The price includes
the grinder.
The next items are the supplies you actually need to make your
window.
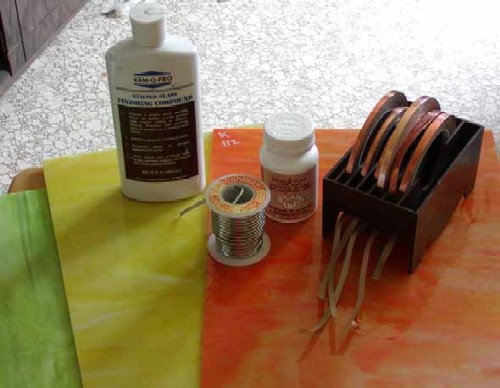
These are the items you will constantly be replacing. I've only
chosen 3 colors of glass purchased in hobby squares at aprox.
$8 a square depending on type of glass. Some glass is priced by
the pound and is much more expensive. Just the items listed above
cost about $50 but they will be able to be used for several projects.
I want to mention that solder and flux should always be purchased
at a stained glass shop. Don't purchase solder from a hardware
store as it is not the same kind of solder. For copper foil you
want 60/40 solder. 60% tin, 40% lead.
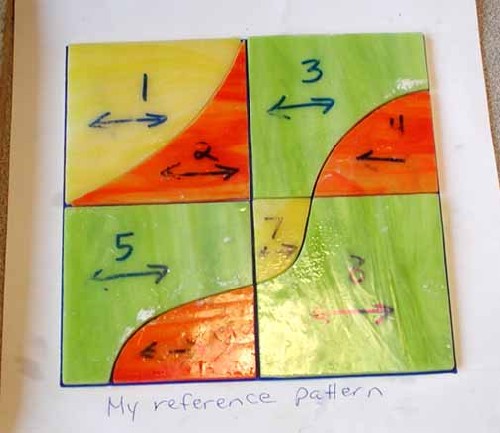
First draw out your pattern. Decide your colors for each piece.
Number each piece. Decide the direction of each piece. And also
mark the color the glass will be in each piece. (Glass will sometimes
have a design or swirl and you want the glass to go in the same
direction if applicable) Trace this pattern exactly on mylar (thick
heavy clear plastic) or manilla cardboard. ( a file folder works
good for this) you might want to tape your pattern to the window
to provide the light to shine through. You want to make sure that
the copy is numbered exactly the same as the first.
The first pattern you will be using to size your pieces. The second
pattern you are going to cut apart like a puzzle and trace around
on your glass.
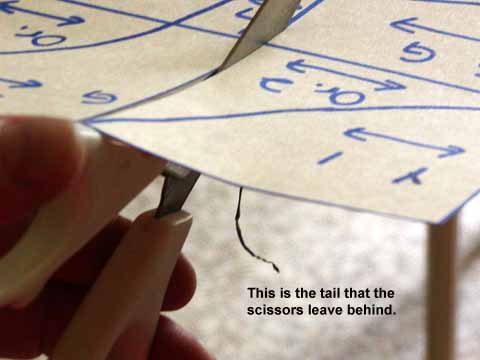
You have to use special pattern scissors for this purchased at
a stained glass supply store. There are 2 sizes of scissors. One
for lead and one for copper foil. These scissors provide the proper
space between pieces of glass that the foil will take up. You'll
catch on later.
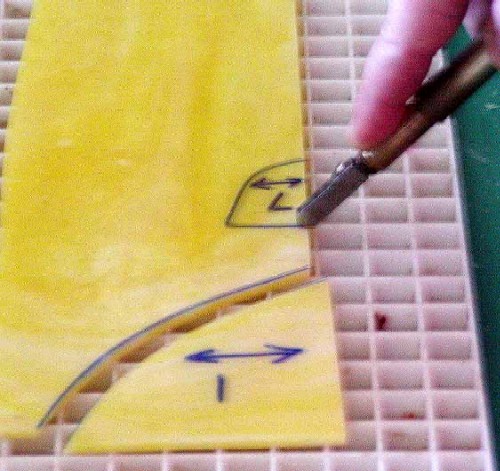
Next trace pattern on glass with your sharpie. When using black
or dark colored glass, you can use white or gold paint pens or
colored china markers. Always keep your marks on the glass until
your piece is ready to solder. There is a right and a wrong side
of the glass.

Cut the glass. Always cut on the smoothest side of the glass.
You might have to flip your pattern upside down to do this. Always
wear your safety goggles. Need I say why?
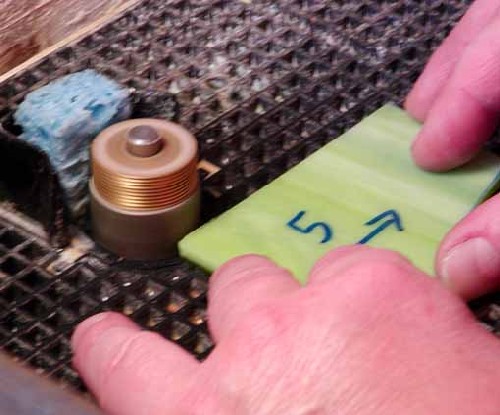
The glass cutter doesn't âCutâ the glass. It just provides what
they call a âscoreâ on the glass. Since I am safety conscious
and paranoid of cutting myself, I use the blue running pliers
to get a run in the glass. Usually with enough pressure I don't
need to use the breaking pliers, (the others shown in 1st pic).
Sometimes you will use breaking pliers even 2 pairs to grip the
glass at the sides of the score and press down to get the glass
to break along the score.
Keep doing this till all your pieces are cut out.
Now place your pieces of glass on your pattern that you didn't
cut apart. See how well they fit. Even if you were the best glass
cutter on the planet, you still need to grind your glass to provide
a smooth finish on the edge of the glass to take off any SHARP
edges (remove paper from the outside of the bandaids in preparation)
I'm making a small joke here but if you are going to cut yourself,
this is going to be one of 2 steps you will do it in.
Also once you have your pieces laid out on the pattern, take your
sharpie and mark any edges you need to take off more glass to
make the pieces fit. Sorry photo was accidentally deleted.
Now we grind the glass. This is a messy step. The grinder always
has to have water in it for the grinder bit. It will splash some
and also will throw off a fine grit of glass. I have made a homemade
back and side board thingy. They have clear face shields that
also keep the glass and water from splashing up, but mine broke.
Always always always have on your safety glasses during this step.
Don't even let bystanders watch without glasses on. Oh, yeah,
this is the 2nd step you could cut your fingers as people have
a tendency to press the glass into the grinder bit. Un finished
edges, ouch.
Fit your pieces back on to your pattern
Now once we know our pieces fit, we place foil on the edges of
the glass. The foil is sticky on one side and you peel off the
backing as you go to make it adhere to the glass. There are different
sizes of foil because glass has different thicknesses. You want
your glass to be centered in the middle of the foil with the least
possible amount of foil showing on the top of the piece. If you
use a thicker foil and you have a large amount of foil and this
will make your solder bead wider. You want your solder line to
be as thin as possible.
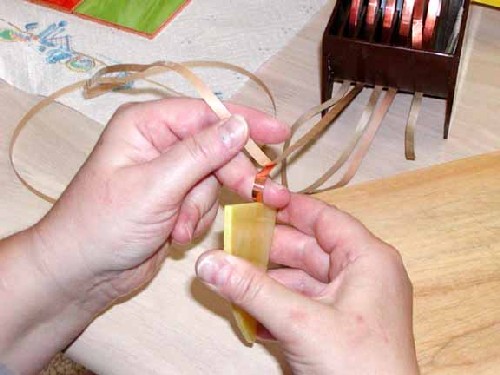
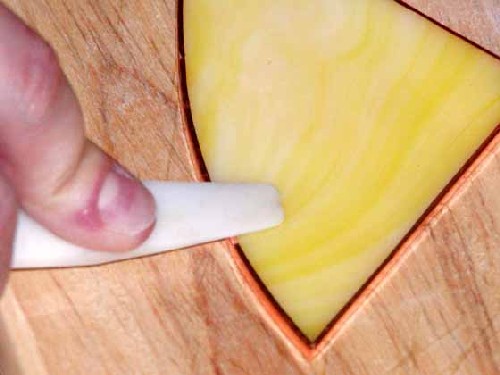
Once all the foil is around your glass, you need to use your fid,
which comes in different shapes, and press the foil down on all
the edges of the glass.
Ok now this next bit of info is one of the things I'm a stickler
about and shows the difference in someone that hurries through
their work, and someone that pays attention to small details.
After a piece of glass is foiled there will be a point where the
foil started and ended. They won't quite meet and there will be
a âtailâ left on the foil. Even if it is miniscule millimeters,
take your x-acto knife and cut it away. It will show up magnified
once it's soldered if you don't cut it away. ( now the next time
you look at stained glass, you are going to look for tails in
the solder lines)

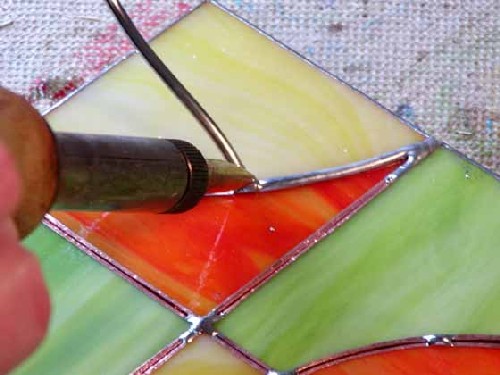
Now we are ready to solder. First block
in your piece so it doesn't move. Take your flux and brush it
on your copper edges. You want to tack your piece together where
each piece of glass will meet the next.

Now you want to get a running bead of solder along the whole piece.
Make sure you have flux on all edges of the copper. Flux makes
the solder adhere to the copper. Without it, it won't stick.
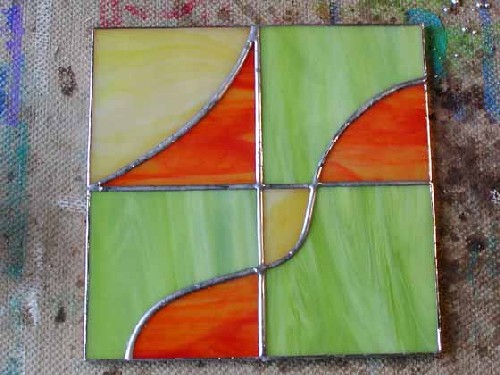
Flip the piece over and solder the back. Now you have to tin the
edges. You want to make sure you have solder on all the edges
around your piece. This is another area where you will see the
difference in someone that rushes through their piece. You want
to provide a build up or a bead of solder even on the edge if
you are going to leave this as your final edge. There are channels
of zinc and brass you can finish off your piece with as another
option. This build up of solder on the edge will add strength
to your piece. You will look at several pieces in stores or craft
shows where they have left this final edge flat. If you are going
to hang your piece, you want to add rings on the back. You always
want to place these rings at a solder joint, or the corner of
your piece for strength so the foil won't pull away from the glass
from the weight of the piece.
Once your piece is finished, you want to wash it up. You always
want to use ammonia free glass cleaner. I just use dish soap and
water. You can purchase special glass cleaner especially if you
are making a large piece that won't fit in the sink.
You're almost finished. You've put a lot of work in to your piece
and you want the solder to look as shiny in the future as it does
today. You always need to put a stained glass wax on your piece
to keep it from oxidizing. If you don't do this, your solder will
be grungy in a week.
Apply the wax with a brush or soft cloth, on front, back and edges,
let dry, and buff to a final finish. Beautiful!!
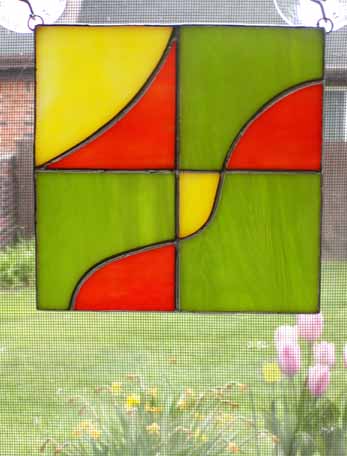
Just one last note. This finished piece was left with a silver
solder finished color. You can use patinas to make your solder,
copper or black, and this would be applied after washing your
piece but before waxing.


