- Home
- Education
- Printmaking Pyrography Scratchboard
- Live Studio Collagraph

I was converted to collagraphs 3 years ago when I wanted to do a series of prints in a much larger size than was my usual. The problem with metal plates was cost, convenience and weight. A fellow printer used to do collagraphs using mattboard as a base so I tried doing one of my own and found that I could make them as small or as large as I liked up to the size limit of the press. What is more they were cheap and light and the results were wonderful.
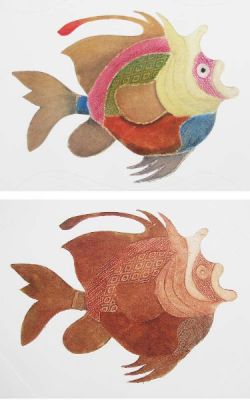
Collagraphs are prints from plates made from a collage of different textured materials.
The composition can be simplicity itself or as complex as you like. It is a process suitable for children or for experienced fine artists and printmakers.
It is a very painterly technique and appeals to artists who like an adventurous experimental approach to their art. A vast range of tones, values, effects and textures are possible.
Collagraphs can be printed as intaglio prints, relief prints or more usually as both intaglio and relief. Let me explain: The finished plate will be made up of different levels, raised bits and low bits. If you ink the plate, pushing the ink into all the low parts and crevices and then wipe and print it like an etching you will get a certain result. If instead you only ink the raised parts, using a roller or brayer you will get a different result, a relief print. If you ink the whole plate, wipe and then top roll the high points, with a different colour, you will get yet another result.
As the plate is three dimensional the paper will also be embossed if you print with enough pressure. This gives added character to the print. Indeed with bold designs blind embossing can be very effective i.e. make a print without inking the plate.
I sometimes combine collagraphs with etchings. I am doing a series of etchings for which I surround the central etching with a collagraph border.

The main steps in making collagraphs are:
- preparation of the design and the baseplate
- linemaking and collage of materials onto the baseplate
- sealing the plate
- inking, wiping and printing
Materials are cheap and easily available. Apart from the paper and inks the rest can be recycled from scraps, found objects, leaves, seeds etc. The tools you will already have. A press is desirable but not essential. I have some old sample books of textured vinyl wallpapers and boxes full of materials from my mother's patchwork activities.

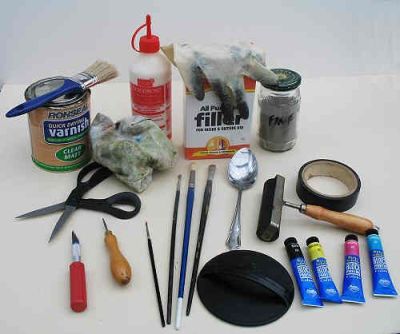
Tools
- Scissors, craft knife, scribing instrument eg old knitting needle,
- Glues and adhesives - mainly PVA or Elmers
- Old paint brushes - I use stiff and stubby old hogs hair ones
- Rags: Scrim, tarlatan or some course muslin.
- Inks and varnish (see later)
- rubber gloves
The base :
The plate can be any stiff, non brittle material eg mattboard, MDF, hardboard, plywood, perspex, acrylic or metal. I suggest rounding the edges so that the paper doesn't tear during printing.
My preferred material is mattboard (mountboard in UK) as I have lots of scraps, it is easy to cut, it comes in various textures and it is made up of layers of paper which you can cut and peel. I can make quite large plates economically. I can be more adventurous as it is no great loss if I spoil a plate.
Being easy to cut I like to make shaped plates as a change from the usual rectangle. You can also make a set of plates of different shapes and sizes, ink them in different colours and print them together.
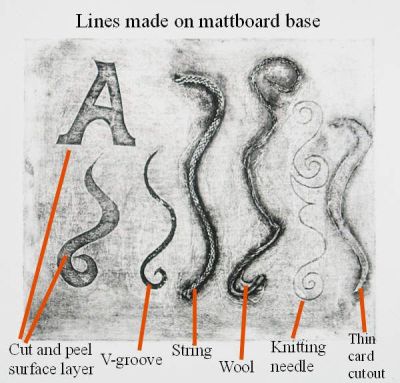
Line making
If you are using mattboard there are different ways to make lines which will print.
- use a pointed object eg a knitting needle or a ballpoint pen. The nature of the line is controlled by pressure and the width of the point.
- use a scalpel or craft knife to cut V-grooves ie cut each line twice at different angles to form a groove, the thickness of which you can vary.
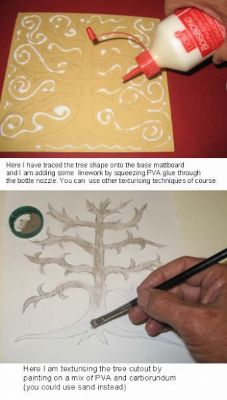
- Squeeze PVA glue through the nozzle applicator of the bottle. Some interesting lines can be obtained with practice. It tends to bead or blob which can give an interesting effect.
- Glue thread, string, wool, wire onto the baseboard
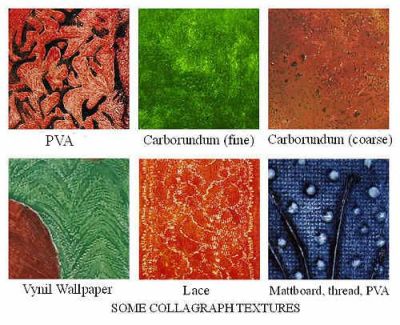
Texturising
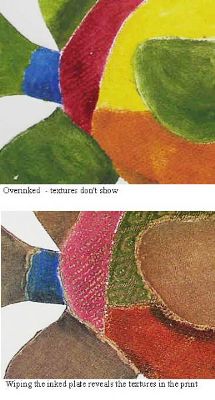
Different tones and ink values are determined by the texture of the plate and the degree of wiping.
The smoother an area the paler it will print. For example well wiped Sellotape or parcel tape will print almost white. Masking tape will print a mid tone. Here are some suggested means of applying texture:
- cut and peel the mattboard base. With a craft blade cut a shape deep enough to penetrate the surface layer of the mattboard. Peel away the top layer and it will expose the layer below with a rougher texture which will print darker.
- paint areas with PVA glue or with acrylic texturising medium. Use a brush with stiff bristles so that the brushmarks show and/or dab with different objects to make a textured surface.
- mix polyfilla with PVA glue, apply and allow to set. When hard you can scrape and scratch textures into it. Or before it gets too hard you can press objects/materials into it to make an impression.
- cut out shapes and glue textured materials to the baseboard. For example:
- textured vinyl wallpapers, sandpaper, any textured paper
- lace, canvas, silk, any textured cloth
- leaves, feathers, fibres
- grain, rice, coffee grains, sand
- carborundum grit: this is my favourite material for collagraphs. With it you can obtain very rich velvety effects. It comes in 3 grades - fine, medium and coarse
- Paint an area with PVA glue and sprinkle carborumdum over it. When dry shake off the excess.
- Or mix carborundum into PVA and apply the mixture with a paintbrush.
Sealing
Make sure everything is securely stuck down.
The whole plate now needs to be sealed in order to protect it and preserve it from inks, solvents, water etc.. so that you can do several prints without the plate deteriorating.
The traditional sealant used is 'Button Polish' which is a made from unbleached shellac. It is like French polish and is used by furniture restorers. However you need to apply at least two coats and leave it to dry for at least 24 hours. It is very hard wearing, glossy and wipes well.
For convenience I prefer to use gloss acrylic varnishes. They are not so durable but perfectly adequate if you are not doing more than a dozen prints from a plate. They are quick drying. Apply two or three coats, including the back of the plate, allow to dry between coats.
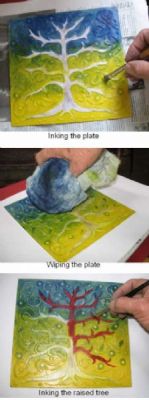
Inking
With collagraphs you can print in many colours from the single plate.
I prefer to use oil based intaglio inks but many kinds of ink can be used including water based inks and silkscreen inks.
Apply the inks with stiff paint brushes or stencil brushes ensuring that the ink gets into all the cracks and crevices. I use my old hogs hair brushes.
You can use a single colour or many colours on the same plate
Some artists print in black only and then hand colour with watercolours.
After wiping, as for an intaglio print, you could top roll in a different colour as for relief printing
Wiping
Don't over ink. You want a very thin film of ink for the plates textures to show through. So excess ink is removed by wiping. Ideally use scrim or tarlatan which is used for intaglio / etching . Or use a coarse muslin or old rags. The appearance of a print changes a lot according to how the plate has been wiped. For example I like the merging of adjacent areas of different colours rather than sharply defined boundaries.
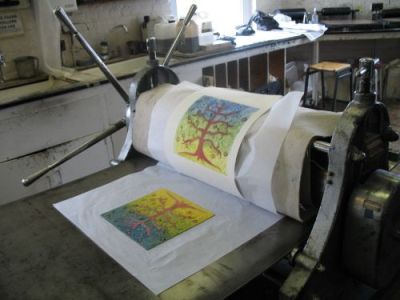
Printing
The best method of printing collagraphs is with an etching press. If you are fortunate enough to have access to one be sure to consult with the technician or person in charge of the press because collagraph plates are often thicker than etching plates so the press will need adjusting. Also if possible use an old set of blankets as they can be damaged easily.
Use a thick printing paper such as Somerset or Rives 250gsm (120lb), well soaked and with all surface water blotted off.
This is to soften the paper so it can be pressed down into the depressions of the plate and contact all the ink.
A relief press can be used - place the plate face upwards, cover with the soaked paper and then place a 2 - 3 inches thickness of foam rubber on top.
Smaller plates can be printed by hand using the back of a spoon or a barren but will probably not be as rich.
I have got excellent prints from smallish plates by driving my car over the plate, paper and a foam rubber blanket
You could also use a garden roller or even a steam roller has been used!
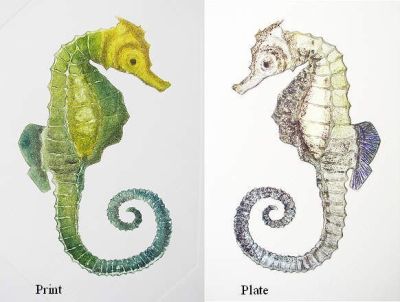
Here is a quick step by step demo of how to make a simple collagraph

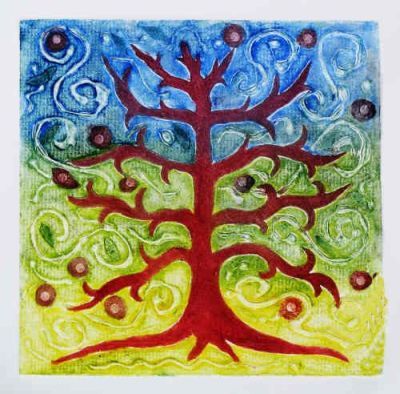
Now for the exciting part - the printing. Peeling the paper back from the plate to see the result of your endeavors is one of the most satisfying experiences in art (for me).
The finished print.
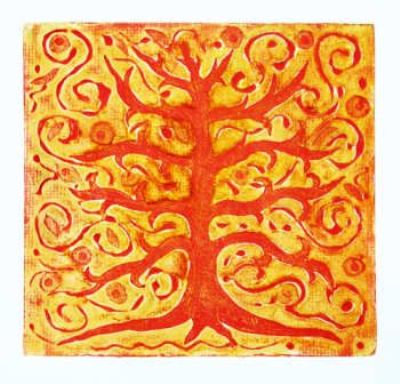
Here is another print from the same plate made by inking with yellow, wiping and then top rolling with red.
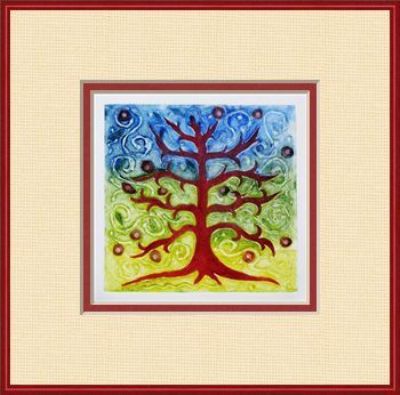
Then tomorrow get it matted and framed!
I have shown you the basics of making a simple collagraph print. There is so much more that I could add but once you have these basics the best way to learn is to try for yourselves. Try different materials, try different inks, different wipings, try scratching, sandpapering, scraping, splattering, dripping, gouging, hammering. Some things will work, some won't. but you will constantly be surprised. I hope I have inspired you to experiment and enjoy this exciting medium.


