- Home
- Education
- Mixed Media and Collage
- Live Studio Collage

Welcome Everyone! I am honored to have been invited to be with you tonight to give you a brief glimpse into the wonderful world of collage! But be forewarned. If this presentation inspires you to try your hand at collage, I cannot be responsible for what happens. It is a highly addictive medium to work in. You may find yourself abandoning family and friends for the "alternate reality" you can create with a little bit of paper, scissors and glue.
So, now that my conscience is clear, having warned you of the dangers of engaging in collage, let's take a quick look at the history of this art form.
The word "collage" comes from the French colle, meaning to paste or glue. Collage involves adhering various materials on a flat surface, a technique pioneered by Pablo Picasso and Georges Braque in their papier collés by gluing materials such as imitation wood-grained wallpaper and newspaper to the surface of their cubist paintings. For example, in Still Life with Chair Caning (1912), Picasso introduced into the work a piece of oilcloth printed with chair caning. The introduction of collage elements to their analytical cubist works allowed Picasso and Braque to explore various color and textural elements. As Picasso explained, "The purpose of papier collé was to give the idea that different textures can enter into a composition to become the reality in the painting that competes with the reality in nature."
On another level, and perhaps more important for the revolutionary quality of collage, the inclusion of prefabricated elements into works of art raises questions about the nature of reality and the possibility of new realities as created by the artist. Katherine Hoffman suggested that, "Collage may be seen as a quintessential twentieth-century art form with multiple layers and signposts pointing to a variety of forms and realities, and to the possibility or suggestion of countless new realities."
Early modern artists turned to these new media to reflect the changing realities around them. The idea of a single reality as promoted by nineteenth-century scientific thought was disputed in the early twentieth century as basic scientific premises were challenged. Artists looked for the means to express multiple realities and turned to the medium of collage, which, for the avant-garde in particular, provided a way to break from traditional painting, in which the work of art presents its own reality, and thereby merge art with life.
Many avant-garde artists also turned to the photographic equivalent of collage, photo montage. The term "photo montage" was invented just after World War I by the Berlin Dadaists for their new style in which photographs became the primary structuring material for art works. The Dadaists used the photograph as a ready-made image, pasting it together with cuttings from newspapers and magazines, lettering and drawing to form a chaotic, explosive image, a provocative reassembly of reality.
Assemblage, the three-dimensional equivalent of collage, also can be traced back to early twentieth-century modernism, such as Picasso's three-dimensional work and Marcel Duchamp's ready-mades. The term assemblage, however, was first used by artist Jean Dubuffet in 1953 for a series of collaged butterfly wings which he called assemblages d'empreintes. Assemblages have been described as "pieces that are predominantly assembled rather than painted, drawn, modeled or carved and either entirely or in part, made up of elements that are preformed natural or manufactured materials, objects, or fragments not intended as art materials."
So, there you go. A brief overview of the history of collage. After re-reading this section, it suddenly hits home why I, personally, must have initially been drawn to this medium. I am a lifelong student of metaphysics with a fascination for the concept of alternate realities so this form of art expression dovetails perfectly with my own beliefs and interests.
Anyway, let's get on to the fun stuff! I am eager to share with you how I go about creating my collage works. First, I don't profess to be an expert in collage. I am just happy to share with you how I go about it. I would highly recommend that you explore other collagists' works, read up on the subject and form your own opinions, primarily through experimentation, as to what are the best techniques to use. Second, let me state that my "angle," if you will, is recycling. As much as possible, I use recycled materials to create my collages. This limits me somewhat in the materials available, but it's important to me to try to keep even little bits of "stuff" out of our landfills if at all possible. Of course, you are free to experiment with whatever materials you wish, but I can tell you that is very personally satisfying to create art from stuff that would otherwise end up in the garbage.
What do you need to get started? Thankfully, collage is an art form that doesn't require a whole lot of expensive materials. This is especially good if you are only wishing to dabble in it to see if you like it or not. Until you decide that becoming a collagist is what you wish to do, my advice is to stick with some simple, basic tools. If you choose to continue with this art form, you can go on to experiment with other more expensive materials if you wish, but it is not necessary. I have been collaging for several years now and still use the most basic of tools to create my work.
Basic supply list:
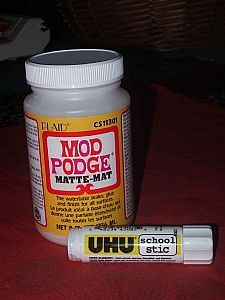
- Glue sticks (like UHU)
- Decoupage medium & brush (Mod Podge is a good one, in matte or gloss)
- Sharp scissors (small ones generally work better)
- Base material on which to create your collage (paper, wood, canvas, etc)
- Assorted paper images
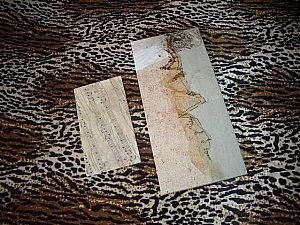
In the next photo you'll see examples of some of the base materials I typically use. The first photo shows a piece of recycled matboard on the right that has been covered with old sheet music. The one on the left is a piece of recycled foamcore board that has been covered with scrap wallpaper and a bit from an old dressmaker's pattern. For both pieces, I have just used a glue stick to adhere the papers to the bases. Mod Podge would work equally well.
The next photo shows you three recycled CDs I regularly use for my work. I love doing collage work on these things, it's so much fun! The top CD has been treated with that gold webbing spray you can find at your craft store. This product gives you a really cool background for your collage work to sit on. The bottom two CDs have been spray painted with flat black. The one on the left has also had a scrap piece of a dressmaker's pattern Mod Podged onto it. The CD on the right has had some vintage French text stamped in silver on it. Both black CDs have had holes drilled into them so that a hanger can be attached when the artwork is completed. I'm not sure if I'll add more to the background for these CDs before starting to create my collages on top, but I'm sure you get the idea.

As you can imagine, there are SO many more examples of what you could use for bases for your collage work. You are only limited by your imagination. Almost any relatively flat surface will work as a base, so think outside the box here and see what you can come up with. Remember, you don't have to use recycled materials like I do, so that opens up myriad possibilities for you. At the end of this lesson, I've included a list of things you might use, just in case you need a little push in the right direction.
So, now what? You've chosen a base and finished treating its background to receive your central images. This is where the REAL fun begins! There are no rules for collage that I am aware of (and even if there were I'd probably break âem). You are completely free to put together any combination of materials or images you like. You can plan your work out carefully if you wish, moving components around on the base until you are happy with the look of the piece. Or, you can work completely spontaneously with no plan at all and just let it happen. This is how I work. I rarely ever plan how my work will look. At most, I might choose a central image that I want to work with but that's about it. Otherwise, I just let things happen as they will, the piece basically creating itself.
One word of warning though if you choose to work this way too. I find that some of my pieces only get partially completed and then will sit on my work table for a period of time before they end up done. This doesn't bother me but it might bother you. I have faith that when the time is right, the pieces will complete themselves, and they always do. However, if it bothers you to have half-finished stuff lying around, you might want to take the "planned" approach to your collage work.
Collage is TOTALLY about thinking outside of the box, so keep this in mind when you are arranging and rearranging images and materials for your piece. Juxtaposition is the key! Try putting strange textural elements together, things that you'd NEVER see together otherwise. Use weird color combinations. Use weird combinations of patterned materials too. Use a bunch of different, discordant fonts together if your piece will have a text element to it. Consider using components that will add a 3D effect to your work. There is no right or wrong with collage. Here's a couple of examples for you to show what I mean about combining strange elements together.
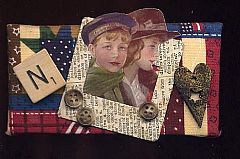
The next image is of a piece called "Nostalgia" and it is made from recycled foamcore board, wrapped in scrap ribbon with an Americana theme to it. A vintage image of a young girl and boy, an old slide mount wrapped in tea-stained text from a discarded school textbook, old buttons, a Scrabble letter and a recycled jewelry piece (black and gold heart made of shrink plastic) were also used. All kinds of weird and wonderful things together! This piece measures approximately 2" X 4."
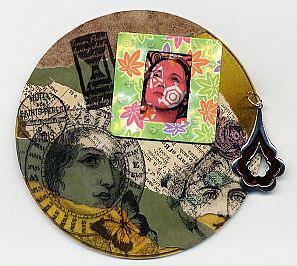
The next image is of a piece called "Copper Leaves" and it was created on a recycled CD, which has a background of scrap wallpaper and text from an old school book. Images stamped on acetate, an old slide mount wrapped in washi paper, dimensional paint and an old copper-colored earring (hanging on right side of piece) were also used. This piece is actually a magnet and because of the use of the earring, dimensional paint and slide mount, has a real 3D effect to it. Another weird combination of stuff, wouldn't you say?
To get you started, here's some basic things you can try. Cut out paper images with scissors for one look or tear the edges of the paper for another very different effect. Paper elements can be stained with tea or walnut ink to give an aged appearance. Scrapbooking chalk gives a neat effect when applied to the edges of torn paper. Rubber stamping can be a KEY component of collage work, so if you're already involved in that hobby, be sure to incorporate it too. It will add SO much to your work.
Turn things upside down or sideways on purpose. Mix it up with a balance of text-based stuff and image-based stuff. If you work in acrylics, oils, pastels or watercolors, try adding these elements to your work. How about some sewn or embroidered components if you happen to be a fabric artist? Polymer clay artists will have TONS of fun incorporating their sculpted 3D bits into a collage piece. Again, there is NO LIMIT!
The next image is of a piece called "Art Essence" and it was created using a piece of recycled vinyl siding (yes, the same stuff you'd put on your house). The background is silver acrylic sponge painted on, along with a scrap from an old bingo card. Another old slide mount wrapped in vintage text, images stamped on scrap paper and scrap acetate, dimensional paint and text from an old schoolbook were also used. The beads were recycled from old jewelry pieces for a real 3D effect on this funky piece. It measures about 2.5"X 5" and has a magnet on the back.

Some collagists like to use layer upon layer of materials to create their work, with an overall outcome of a very "busy" piece. Others prefer a minimalist approach, carefully choosing each component because it will have to stand on its own within the piece (much like the Japanese art of ikebana). Again, there is no right or wrong. Experiment and see which approach you like best. Your own style will emerge over time.
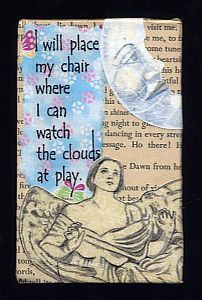
The next two photos show examples of both a simple piece (called "Clouds At Play") and a busy piece (called "Contemplation"). Each piece will evoke a different mood from the viewer.
When you are happy with the layout of your piece, you can begin gluing the elements into place. A glue stick or decoupage medium works well for this. Take your time and be sure to adhere each piece well to the base. Be sure to allow some of the background you created to show through and to overlap the component pieces for a random look. You don't want your work to look forced or "staged." Stand back from your work from time to time to gain some perspective and see how it is progressing. Make sure it is balanced and doesn't have too many images on one side and not enough on the other. Also, be sure to glue some of the elements that will appear around the edge of the piece so that they overhang the edge. This, too, helps to create a random look to your work. Trim overhang as needed.
When you are completely finished gluing all your components onto the base and everything has had a chance to dry, then add several coats of the decoupage medium to seal the piece. I prefer a matte finish rather than a glossy one but it is up to you. Again, I'd recommend starting with Mod Podge or a similar product. It is cheap and works as both a glue and a sealant. If you decide to stay with collage work you can go on to experiment with other glues and sealants for different effects. Any 3D elements you plan to incorporate should be added once the piece is otherwise finished. Depending on the weight of the 3D element you may wish to use a stronger adhesive to hold it on, like E-6000 or Goop.
I never worry about my finished piece being a bit lumpy and textural and I encourage you not to worry about this either. My work is meant to be fun, funky and primitive-looking which means it is anything but perfect. You'd be hard-pressed to create a collage and have it come out completely smooth and perfect anyway. And REAL art, to me, is not perfect, or it wouldn't be real. The little bumps and flaws are what gives the piece its character, just like each of us. Following are a couple of examples of pieces of my work that were anything but perfect but still found homes with people who loved them.
Well, I could go on ad nauseum on the subject of collage, but I think we'll stop here. So much of what collage work is about is experimentation with different techniques and materials and we are a bit limited to how much we can cover in a short session like this. I hope I've piqued your interest in collage so that you'll be inspired to give it a whirl. You are welcome to ask any questions now or to email me later at: joannabanana@shaw.ca if you care to discuss the subject further. Thank you for your time and have fun collaging!! Materials lists follow.
Materials To Use For Collage Bases:
- Matboard
- Foamcore
- Canvas
- Wood
- Cardstock or other heavyweight paper
- Watercolor paper
- Cigar boxes
- Shipping Tags
- Papier mache boxes, trinkets, ornaments, etc.
Materials To Use In Your Collage:
- Clip art
- Vintage photographs
- Sheet music
- Magazine clippings
- Mulberry paper, washi paper, scrapbooking papers
- Labels (from cans, matchbooks, cigars, etc)
- Old letters and documents
- Discarded textbooks
- Maps
- Wallpaper
- Acetate
- Scrap fabric
Other Materials To Use:
- Buttons
- Old jewelry components
- Game pieces
- Keys
- Beads
- Ribbon and fibers
- Feathers
- Scrapbooking chalk
- Rubber stamps and inks
- Acrylic paint
- Pastels
- Colored pencils


