- Home
- Education
- Glass Stone Clay
- Live Studio Polymer Clay I
Live Studio- Polymer Clay 101
Andree Chenier
Glass, Stone, Clay
Polymer clay has been available to the public for about 30 years now, and it has been growing in popularity in the last decade. There are now several varieties of polymer clay to choose from, depending on what your preferences are. Some clays are softer and more easily manageable and some are stiffer. Only experience will determine your favourite type.
Unlike kiln-fired clay or air-dry clays, polymer clay is a man-made clay made of PVC. One of the reasons this is one of the preferred clays for miniature artists is because of how well it holds details. Another reason it's grown so much in popularity is because you can cure it in your home oven. This clay doesn't require the high temperatures of a kiln in order to harden. Depending on the brand you use, the instructions will tell you to cure the clay between 260-275°F.
I'm currently using a dedicated toaster oven with a thermometer to do all my clay baking. If you do use your cooking oven, be sure to wipe down the walls of your oven after baking to remove any residue. Also purchase a separate oven thermometer as ovens are often off by 20 or more degrees. Keep a close eye on your piece while it's baking to avoid burning the clay. This releases toxic fumes. If the clay does burn, open all the windows and leave the house until all the fumes are gone. Another precaution to use is to properly wash your hands after handling the clay to make sure no residue is ingested. I often wear latex gloves when working. As well as keeping my hands clean, I find that it keeps my lighter coloured clays clean from dust particles that would otherwise accumulate on my fingers.
Now, on to sculpting! I've always felt that learning happens fastest when you're actually doing the task as opposed to just reading tips so I'll do a demonstration. I'm going to make a miniature baby and show in-progress pictures. I enjoy making my baby gargoyles the best but you could easily use this tutorial as a basis for a human baby; just choose skin tone clay, make rounded ears and don't exaggerate the features as much as I do. The baby will be approximately 1.5 inches long but you can choose to make one larger, or you can use your imagination and create something different by using the tips I'll give you. Don't be afraid to be creative and see what you come up with!
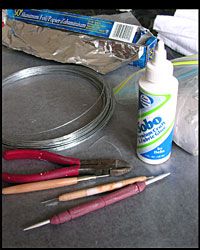
Materials:
- Polymer clay
- Wire armature (1 inch long)
- Aluminum Foil
- Paint (acrylic or water-based oils)
- A bit of white fabric
- Sculpting tools (everyone has their favourites: I prefer knitting needles, a blade tool and a needle tool)
- An oven to bake your piece
|
| 1. Armature (optional) | |
|
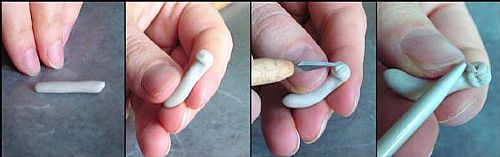
First you want to get your armature ready. For a figure this size,
armature isn't necessary, but I like to use it because it helps the clay
keep its shape.
You can make your armature by rolling 2 pieces of aluminum foil into small balls, making one about half an inch wide in diameter and the other one slightly larger. The smaller one will be for the head and the larger one for the body. Also cut yourself a piece of armature wire. Since I'm making a 1.5 inch long baby, my piece of wire will be about 1 inch long. |
|

|
|
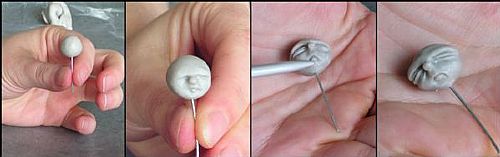
| 2. Head | |
| Start the head by covering the smaller ball of foil with clay. Make sure the clay layer is thick enough for you to be able to sculpt details into the head, like the eye sockets. Once you have a smooth round ball, poke your wire into it so that it pierces the foil. You'll later poke the other end into the body. | |
| 3. Facial Features | |
| Start by mapping out where you want your features to go. You can refer to a proportion chart if you want, or just experiment using your imagination. When you're happy with their placement, start refining them with smaller tools. Try to go from general shapes to more specific details. This will help you keep perspective on your piece. You can try adding small amounts of clay to build up the cheeks, create eyelids and make fuller lips. | |
|
|
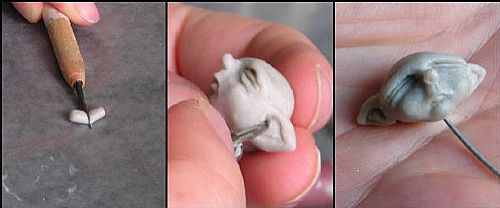
| 4. Ears | |
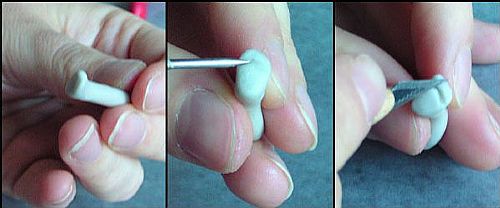
|
Once you're satisfied with the look of the face, you can add ears. My
ears will be quite big and pointy because thatââ¬â¢s how I want my baby
gargoyle to look, but if you're doing a real baby, make them a little
smaller. Iââ¬â¢ll give you 2 tips at this point that might help you out:
Tip: First, if you're making 2 of the same (like ears, eyes, arms, etc.), you want to use the same amount of clay. The best way to do that is to estimate the amount you'll need for both, make a log out of it, and cut it in the middle. This will help avoid having to add clay to one piece because it's smaller than the other. I find it's more difficult adding and blending clay than it is to remove it. Tip: Whatever I'm making, whether an arm, a torso or an ear, I start it out by making a smooth ball. This helps to reduce unblended seams without warping your piece. Once you have a ball, you can roll it into a log or reshape it the way you want by gently using pressure. Once you have your clay for the ear, make a ball, pinch it into an ear shape and blend it onto the head, going from the ear and smoothing it onto the head. You can then use a needle tool and create the ear canal and cartilage creases. |
|
|
|
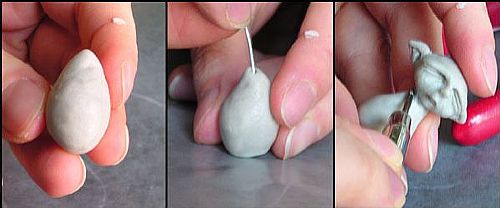
| 5. Torso | |
| We'll start the torso very much like we did the head, by covering the large foil ball with clay. Make a smooth ball with it and then pinch it towards the top, where the neck will be so that it's more of an egg shape. Here, you'll poke the end of the wire that's sticking out of the head into the torso, so that it's embedded inside the foil. The head is now properly anchored to the torso. | |
|
|
| 6. Arms and Hands | |
|
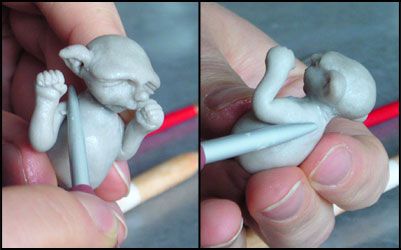
The hands we'll make will be close-fisted. Create a log and make it the
thickness you want the arm to be. Create a thinner area for the wrist,
so that the hand is a small stump. Look at your own closed fist and try
to shape your clay in the same way, making sharper edges where the
finger joints should be. Don't make the thumb yet. Use the blade tool to
mark out the individual fingers, and where they curl into the palm. You
can then refine them with a needle tool.
For the thumb, roll a small log the same size as the fingers and apply it where the fingers curl into the palm. Blend it above the wrist on the side of the fingers (which side depends on which hand you're making). You can then add nails by using the eye of a needle. |
|
|
|
| 7. Legs and feet | |
| Start by rolling out a log the size the leg should be. Create the shape of the foot by making a heel, foot arch, ball of the foot and toes (the toes don't have to be detailed yet). Once you're happy with your "sock" shape, use the blade tool to make separate toes and then refine them with a needle tool. You can then use the blade tool to make wrinkles underneath the foot. | |
|
|
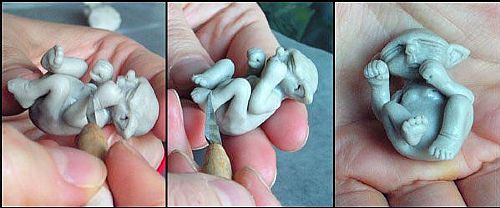
| 8. Putting the body together | |
| Blend the arms and legs to the body. If you want to make bent limbs like I did, you can bend them and shape them before attaching them to the body. | |
|
|
| 9. Adding details | |
| At this point, your body is done and you can add details if you want. I like adding wrinkles, nipples and a belly button. | |
|
|
| 10. Baking | |
| Once you're satisfied with your piece, put it in the oven. Bake it according to the clay instructions and let it cool in the oven. A warm piece is very fragile and can easily be broken by handling. | |
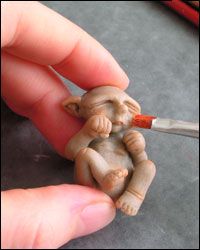
| 11. Painting | |
| You can now paint accents on your baby. I like to dry brush a bit of pink on the cheeks, ears and lips to add a more life to my baby. You can also put varnish on the lips for that goobery look. | |
|
|
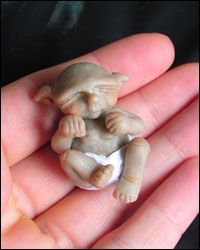
| 12. Diaper | |
| Looking at the shape of your baby, trace out a diaper on white fabric. You can measure the baby to make sure the diaper will be long enough and wide enough. You can then apply some anti-fraying glue to the edges and glue it on your baby. | |
|
|
And there you have it!
If you'd like more information on making figures of polymer clay, Katherine Dewey has recently come out with a wonderful book full of tips. It's called Creating Life-Like Figures in Polymer Clay and is available on her site at http://www.elvenwork.com.
In addition, here are other online resources that are very valuable:
- The Glass Attic: http://www.glassattic.com/
- Polymer Clay Central: http://www.polymerclaycentral.com/
- National Polymer Clay Guild: http://www.npcg.org/
- Polymer Cafe Magazine: http://www.polymercafe.com/


