A Faerie Quilt from Start to Finish:
A peek in the studio of Wendy L. Feldmann of Waltzing Dog Quilting Arts
Welcome to my studio!
One of the most important things I've found when having this much fabric is to keep it organized. I have shelves organizing fabric yardage & containers neatly holding fabric that I've cut into cut into strips for edging. There are drawers that organize scraps of fabric and thread by color.
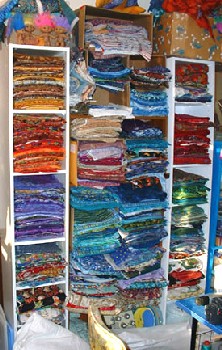
This is a shot of ââ¬ÅThe Great Wall of Fabric". I try to keep it organized mostly by color groups - although some things have separate sections ~ like water, feather prints, stones and pebbles, celestial prints ~ It's great to be able to locate a shade or a motif quickly. (You can also see my Troll family up top, watching over things...)
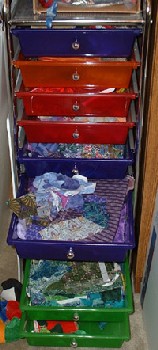
This stack of drawers holds smaller scraps of fabric organized by color. I also have a stack of drawers like this one for my collection of Madeira embroidery thread.
Materials I use to make an Art Quilt:
Backing fabric (old cotton sheets work great)
Batting (I prefer thin)
Variety of colored/patterned fabrics
Thread (I mostly use Madeira, but any will do)
More thread (I use a LOT of thread)
Glue (Aleene's ~ OK To Wash ~ watered down JUST a bit)
Small paintbrush for applying glue
My Favorite Tools:
Scissors (my new favorites are by Dovo)
Tweezers for placing some pieces
Iron (I use my Mom's ancient travel iron (it's very small & light)
A piece of cardboard or foamcore to work on, and one to cover
A large piece of cardboard covered with a couple old towels as a pressing surface
Sewing Machine!!! (with embroidery or a darning foot)
Overview of Technique
Using brightly colored commercial print cotton fabrics, I arrange a fabric collage over a layer of batting, using glue to hold pieces in place. I then use the sewing machine for free-motion embroidery. (It sounds so simple!)
My idea was to have a faerie drinking tea by a mushroom, under a tree. I like working with faerie images (they are so delightful, and make people smile)!
I've been concentrating a lot this year on working with value, so that the image reads well at a reduced size.
Technique for the collage:
I usually cut a larger chunk of fabric, press it, then cut out the shape I want. Sometimes I use the motif on the fabric as a guide. Sometimes I just let my muse guide my scissors. I get ideas when my eye is caught by a piece of fabric, or by the surprise that happens by having a cluttered studio! :-)
The Backgroundââ¬Â¦
I start with a piece of plain cotton fabric covered by a piece of thin batting. This piece is about 23"Â x 26"Â. Next, I begin to create a landscape of sorts from cotton print fabrics. You can see a stack of "sky" fabrics there in the photo.
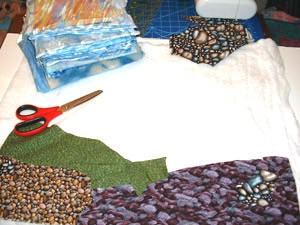
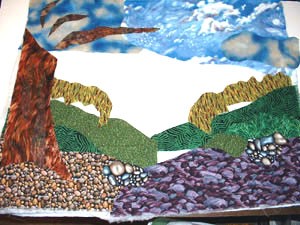
More landscaping:
The Image:
Sometimes I have an idea or a pose for the main character in mind, but sometimes I just let the piece suggest the character as I work on it. But for this quilt, I just let her happenââ¬Â¦
I created a mushroom for the Faerie to be seated by; I went ahead and glued the pieces of this together already, to keep them from shifting.
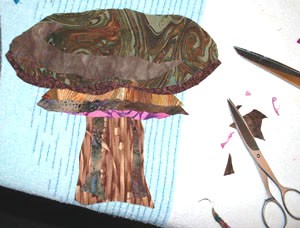
Here, I've created the faerie's tea cup, and placed the mushroom. A tree is coming together on the left, and that's the faerie's head there in the center. I decided to make her body be lavender:
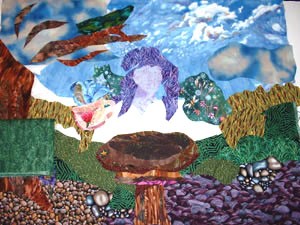
Here, sheââ¬â¢s gotten a body of sorts, although the shape isnââ¬â¢t right yet. Sheââ¬â¢s sitting cross-legged. Since I realized that the faerie was bigger than I was going for, I moved the mushroom to the right and a little behind her to make it in scale with her. The tree has more leaves now. I created a teapot to match her upraised teacup.

I had been making butterfly-ish wings for my faeries, but this time I thought Iââ¬â¢d try dragonfly wings. I also added a layer of sparkly tulle on top of the wings. The embroidering later will add the final touches to the wings ââ¬â I might use some metallic thread there, too. Sheââ¬â¢s gotten a skirt, and I like the shape of her feet better now.
So, the pieces are assembled, the placement is modified until I'm happy, and I add a little more glue to hold things in place. I use a small paintbrush to apply the glue, then iron to dry quickly. Otherwise, Iââ¬â¢d have a complete mess cascading off of my sewing machine table as I sewed!
Often I add a few more things to the landscape, like flowers and foliage and such. Iââ¬â¢ll also add stars to the sky, and touch up any gaps in the landscape with bits of fabric.
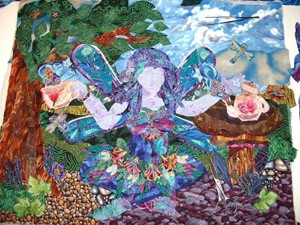
And here she is, all glued up and ready to be embroideredââ¬Â¦
The Sewingââ¬Â¦
The next step is the sewing machine! It usually takes well over 3 hours to quilt a piece this size, using free-motion embroidery (which is like drawing while holding the pen still and moving the paper... tricky, but you get used to it.) I use an Elna 6004 sewing machine which I LOVE. I use Madeira rayon thread, which I have in lots & lots colors.
I drop the feed dogs on the sewing machine ââ¬â these are the gears beneath the needle that move the fabric thru the machine. With them out of the way, I can move the fabric in all directions as I work. I use a darning foot for my machine, which is a small acrylic hoop about the size of a fingerprint.
Sometimes I let the motif on the fabrics suggest where I want to stitch, sometimes I just create swirls, and I also use the stitching to add elements, such as hair, highlights, and features.
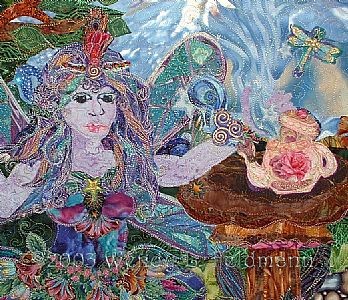
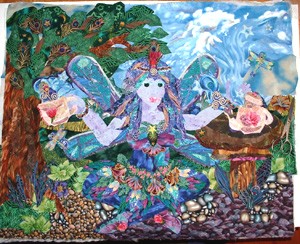
Here she is after most of the sewingââ¬Â¦

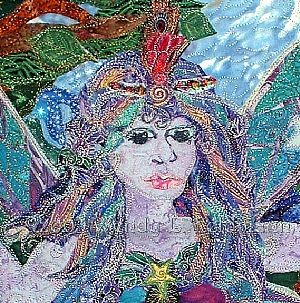
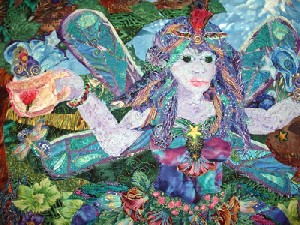
And this is a detail shot of her faceââ¬Â¦
I wish you could see the sparkle on her wings! I still need to do more stitching, and will add metallic threads as well for highlight.
Once she's all quilted, Iââ¬â¢ll add a fabric frame, and loops or a sleeve to the back for hanging. And Viola!
The finished product: