- Home
- Education
- Miscellaneous Articles
- Create a Work Bench
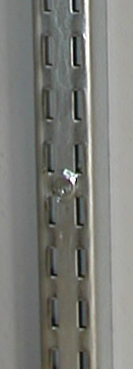
The entire systems can support up to 2400 lbs, so they are not the old 70's type brackets, they are much larger and stronger. Each standard, if properly mounted can support up to 1200 lbs, each of the supported brackets can support up to 300 lbs, and each of the straight brackets are rated for up to 150 lbs.
The parts for just the paper rack ran about $50. The overall cost was about $300 for the wood and the bracket system for outfitting the studio space, which included:
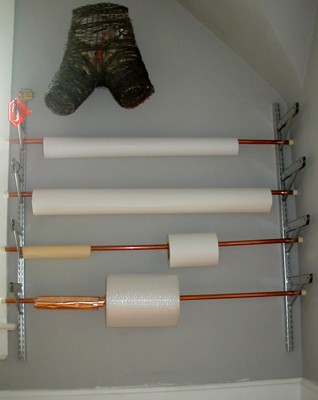
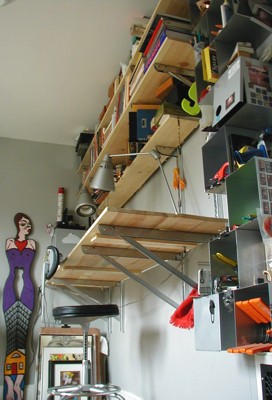
-- a 52" wide, 4 pole paper rack
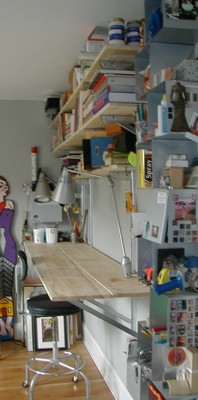
-- an 8' x 2' workbench
-- two 8' x 1' shelves and one 6' x 8" shelf.

The bracket system is made by The John Sterling Corp and I bought the parts at Home Depot. The site has a where to buy section also. Here is a link to their site.
I would recommend browsing the site beforehand, viewing available components and planning your project to fit your space before you head to the hardware store.
The parts used to create the example shown are:
-- four, 6' standards for the bench and shelves
-- two 4' standards for the paper rack
-- aprox. 40 4â hex head bolts to attach the standards to the walls
-- four 22â supported brackets for the workbench
-- eight 11â supported brackets for the two large shelves
-- two 5â straight brackets for the small shelf
-- eight 11â supported brackets for the paper rack
-- four ¾â diameter copper pipes that were each 52â long
-- eight plastic end caps for the copper pipes (in the plumbing dept)
-- four 1âx12âx8' pine boards; two for the workbench, one for each shelf
-- one 1âx8âx6' pine board for the small shelf
-- one 1âx6âx6' pine board that was cut into 3-22â braces for the workbench
-- Aprox. 24 - ¾â wood screws to attach wood to the brackets
-- Aprox. 12 1 ½â wood screws to attach the braces to the bench underside
DIRECTIONS FOR THE WORKBENCH AND SHELVES
It's easiest if you have a buddy to help out. Start by mounting the standards to the wall. It is very important to mount these properly as this is the structural support for the entire system. I recommend using the hex head bolts as opposed to screws since they are so long, I found I was stripping out the screws and my drill bits before I could get the bolts all the way into the wall. For frame walls you will need to use a stud finder to locate where the studs are in your walls. If you have masonry walls, you will need to use anchors and masonry bolts to help secure firmly into the walls. Use a level to define the top edge of where the standards will be mounted. I chose to install an 8' workbench and shelves with one corner flush to the wall and the other open. Measuring from the corner, I chose to locate the standards at 16â, 32â, 80â and 96â. Rather than spacing them evenly, I grouped two of them at either end with a 4' space in between. This gives me more legroom to work in the center of the bench without hitting a bracket with my knees.
For stud walls, I would recommend using a drill with a bit slightly smaller than your bolts to pre-drill the bolt holes. Attach the first bolt in the center of the standard and then use a level to check for plumb, adjust the standard as needed and drill and attach the rest of the bolts. Repeat until you have all four standards firmly attached to the wall.
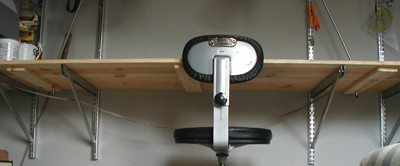
Decide where you want to locate the shelves and the bench surface and pop the brackets into the slots. I chose to locate the workbench surface at 40â high. This is the ideal height for me as it accommodates my drafting stool (perfect bar stool height) and is also a comfortable height to work at while standing as well as sitting.
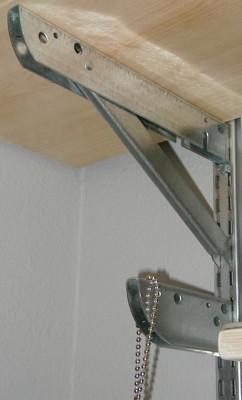
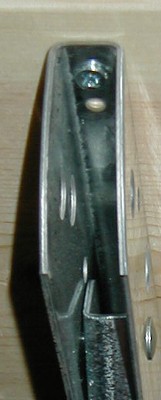
I have used two types of brackets, the heavier supported brackets for the larger book shelves and a smaller straight bracket for the small shelf
To make the workbench surface I used two 1â x 12â x 8' pine boards that are braced underneath with 1â x 6â x 22â pine boards. Before I installed them I sanded all the edges to round the corners and take off any splinters. To make the bench surface, lay the two large boards flat on the ground and align them. I cut three 22â support braces from a 1â x 6â x 6' piece of pine. Locate these so that one is in the center of the work surface and the other two will be centered between the outer pairs of brackets (in this case the edge is 13.5â in from each edge of the bench)
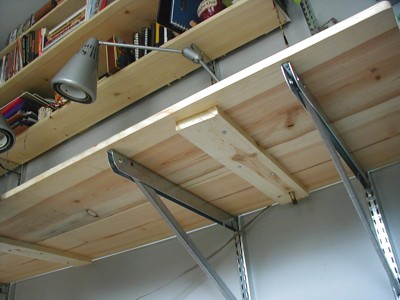
Using four 1.5â screws per brace, attach the braces to the large boards. Flip it over and place on the brackets. The brackets have holes for securing the wood to them. Use the ¾â screws to attach the wood work surface to the brackets.
The shelves follow the same basic procedure: sand, place and attach to the brackets using the ¾â screws. Here is a view of the completed piece.
DIRECTIONS FOR THE PAPER RACK
Following the same procedure as for the workbench and shelves above, attach a pair of standards to your wall. You can make it any width, but bear in mind what you will be using it for, Kraft paper is about 36â wide, watercolor rolls are about 44â wide. Based on the size of my wall, I placed my standards at 48â apart and had the copper poles cut to 52â each. If you are going to make a wider rack or use the really large heavy rolls of paper I would recommend using steel pipes instead of copper for extra strength. I chose the copper because the oxidation on the steel pipes rubbed black on my hands and I didn't want that to discolor my papers. To solve this problem with steel pipes, you could paint them before installation. I sprayed a clear coat on the copper pipes as well for the same reason.
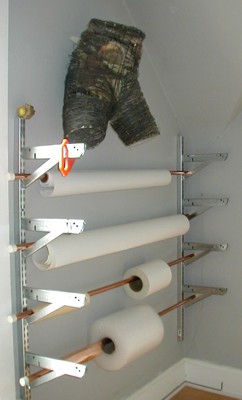
This is the paper rack I built. I used 2 - 48" standards and 8 - 11" supported brackets. There are 4 copper pipes that were each cut to 52" and capped with little rubber caps from the plumbing department. The caps help to keep the poles from sliding out of the brackets or scratching up the wall when I am pulling a sheet of paper off.
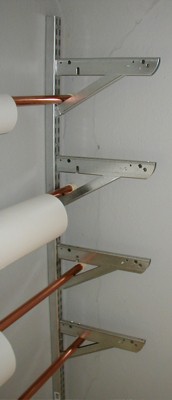
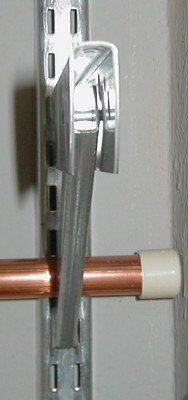
Locate your brackets and snap them into place. Feed the pipes through triangle formed by the bracket support. The pipes float inside of the bracket supports and can handle rolls of whatever up to a 5" radius (or 10" diameter - like the roll of bubble wrap.) If you needed to accommodate thicker diameters, you could use the larger brackets. You could also mount additional shelves above each of the brackets if you needed additional flat paper storage.
RECOMMENDED TOOLS
-- Electric Drill, drill bits, long screw bits
-- Electric Sander
-- Socket Set, either manual or for your drill
-- Level
-- Pipe Cutter
-- Stud Finder
-- Yard Stick and Measuring Tape
OTHER âGood Things'
You'll notice in the pictures that I have also mounted a pair of adjustable task lights to the workbench. I use these all the time and I can't imagine not having the extra light for working. What I like about these are that they direct extra light to the work surface but keep it out of my eyes. This pair of old architect lamps were found at a thrift store for $5. The modern version of these lights can be found very cheap as well and clip lights would also work.
I also made little "S" hooks out of copper wire. You can hang them in the unused bracket holes and hang small tools like rulers and protractors from them.


