- Home
- Education
- Drawing Painting Pastels
- Live Studio Airbrush
At first glance, airbrushing seems a little intimidating-all the hardware required to get started can be quite an investment, and then you have to learn to control the instrument. To many, using a machine to apply paint just seems too foreign a concept.
Yet, airbrush painting has many useful applications, and can achieve paint effects unique to any other art tool. An airbrush is just that: a tool, and in the hands of an artists it can become a powerful means to crate art.
I've been a professional illustrator for 15 years at an ad agency, and have used an airbrush since well before that. Digital illustration now occupies most of my work schedule, so my airbrush use is mainly confined to personal work.
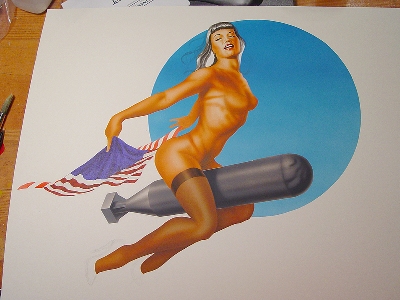
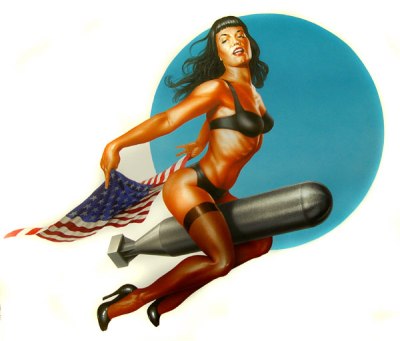
I have been a fan of pinup art for many years, and pinup will be the subject of my demonstration. 50's icon Bettie Page arrived a decade too late to grace WWII bomber nose art, so I decided to remedy that with this tribute painting.
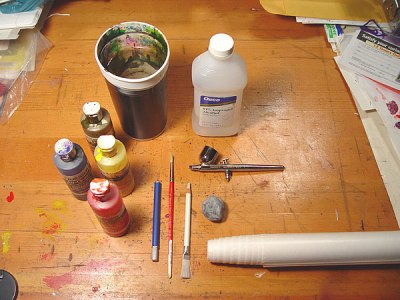
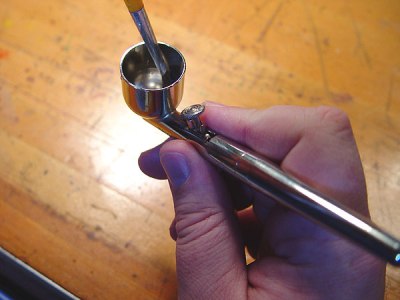
I gather all the materials I'll need around my workspace, so they'll all be handy while I'm working. First and foremost is my airbrush and air compressor.
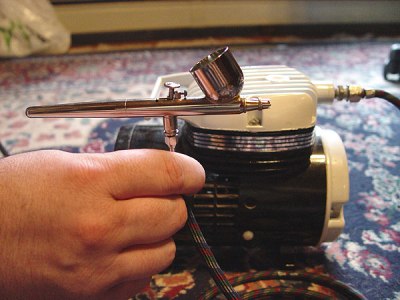
The airbrush I prefer is a double action, internal mix tool with a "fine" spray tip. Double action refers to the 2-step working of the trigger: push down for air flow, pull back for paint flow.
Internal mix means that the air contacts the paint inside the tool, atomizing the paint before it leaves the spray tip. This results in a finer spray.
My compressor is a small unit that has been going strong since my parents bought it for me in 1983! There are many better and quieter models that have become available over the years, so I suggest shopping around for a model that suits your needs and budget.
The other materials I use while airbrushing include frisket film, (more on that later), an x-acto knife with several new blades, paintbrushes, fresh water, and acrylic paints. Some tissues nearby come in handy to sop up any accidental paint splatters!
I've done some preliminary work before I'm ready to airbrush. I've transferred my concept sketch to 16"x20" illustration board, and have done some under painting with a standard brush and acrylics, thinned and applied like watercolor. I want to establish some of the harder edged color areas, especially in the face. The airbrush is made for producing smooth color blends, but for a piece of this size, I'll still need the precision of a paintbrush for small details.

With the base flesh tones blocked in, it is time to start airbrushing to deepen the colors and blend them together.
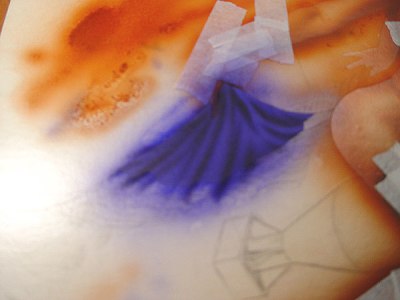
First I will apply frisket film to the entire board surface. Frisket is a thin adhesive backed plastic sheet used to mask areas of the board from unwanted paint spray. It is important to use a fresh knife blade for cutting, and cut gently so as not to score the surface of the illustration board. I cut out all the shapes I need to spray now, following my pencil lines on the board underneath, since I won't be able to see my faint lines later once I start spraying. Changing the blade frequently will mean less pressure on the knife and less scoring of the board.
I use the tip of the blade to gently pull up an edge of the film, and peel off all the pieces covering the flesh areas.
SAVE the removed pieces since they will need to be put back down when the next color is sprayed. I stick the removed film to the wall behind my desk.
Time to paint! Start the compressor and begin to mix paint in the airbrush color cup. I use Badger air opaque acrylics in my airbrush. Although they are pre thinned to run directly through the airbrush, I always add a small amount of water to help the paint flow better. I drop paint into the color cup, counting the number of drops of each color, in case I need to re-mix later. An old brush is handy to swirl around and mix the colors thoroughly before spraying.
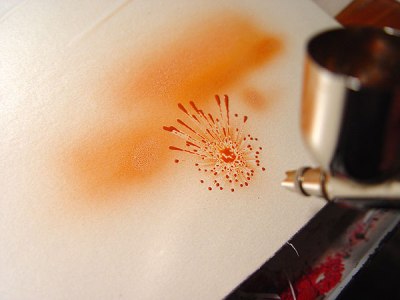
I do a few test sprays on a scrap piece of paper first to test the color and determine if they pant is thick enough. Too much water will make the paint puddle up on the board and also seem under the frisket. Add more paint to the cup, a few drops at a time, and re-test the spray. When the paint lays down nearly dry, it is the right consistency.
Begin painting by moving your hand/arm first, then begin spraying paint. Keeping our hand moving at a consistent speed will result in a smooth stroke. Keeping your hand moving after you stop spraying will prevent a heavier blob of paint at the end of the stroke. Think of the "follow through" motion of throwing a ball or a golf swing.
Paint in thin layers, building the paint up slowly. Patience will produce the best results.

Continue painting until the color builds up to the density you want. Never spray in one area until it appears wet. If an area looks wet, let it dry first before adding paint to avoid ripples or drips.
When all the flesh areas are done, I carefully replace the frisket over the painted areas, making sure to completely cover the holes
A helpful trick I learned many years ago is to tape over the cut lines in the frisket with low-tack drafting tape. I usually only tape between frisket pieces I no longer need to remove. The tape keeps new paint layers from from seeping through the fine channels of the cut lines, and I use drafting tape so it will be easier to remove if I need to pull up an old piece of frisket again.
I peel off the frisket over the next color area and get ready to paint the next color. If I can't continue painting within a few minutes, I will disconnect the airbrush and completely clean it. Otherwise, I'll empty the color cup, wipe out any remaining paint with a tissue and spray some clean water through the instrument to remove the last color from the airbrush tip. Keeping the tip clear of dried paint buildup is the best way to keep the tool working properly.
Time to paint the next color. I follow the steps of painting and cleaning until all parts that require airbrushing are finished.
When all the airbrushing is complete, disconnect the airbrush and clean thoroughly. The paints I use are water fast, but will dissolve with window cleaner or alcohol. If there is any paint that is too dry to easily wash out of the airbrush, I may soak it for a few hours in a cup of window cleaner.
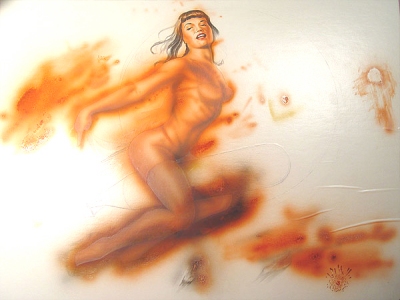
Here's a look at the board after all the spraying has been done. By now the frisket is an ugly mess, but hopefully it looks nice underneath!

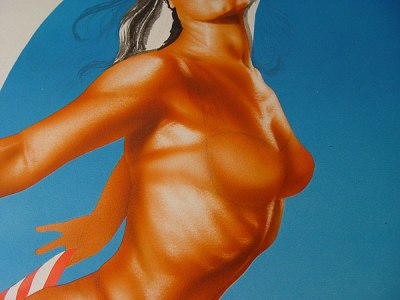
Next, I gently remove all the frisket from the board. I check the painting over for mistakes, and like nearly every airbrush project I've done, I find some. Knowing how to fix them is the real art!
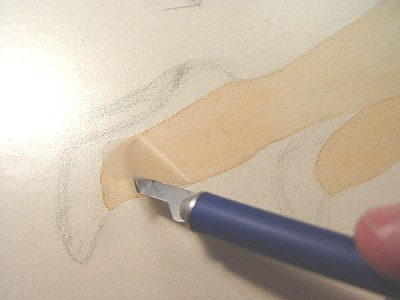
Since I had already painted the mouth in my underpainting step, I had cut a mask of frisket to keep the flesh color from getting on the lips and teeth. I forgot to cover this area with drafting tape, and while I was painting the blue background I broke another of my rules and let the paint build up a little too heavily, and it seeped into the cut line around the outside of the lips. Now Bettie looks like she has a really nasty lip-liner.
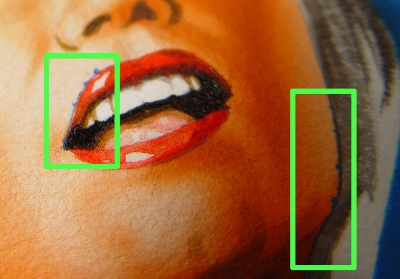
My fix: using the knife edge sideways, I gently scrape the ragged blue paint from the board surface, like I'm "shaving" the paint off. I work very carefully so as to remove as little paper from the board surface as possible.
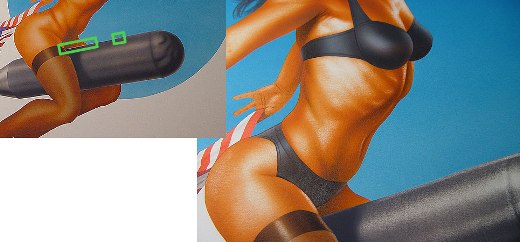
Another common mistake, and one I did here as well, is to leave a glaring white edge between color areas. This is caused when two pieces of frisket overlap slightly and block any paint from reaching the board in that spot. This is where my habit of counting drops of paint comes in handy again (and you thought it was just OCD!). I can easily re-mix a previous color, and with a fine brush I retouch the edge until the problem is fixed.
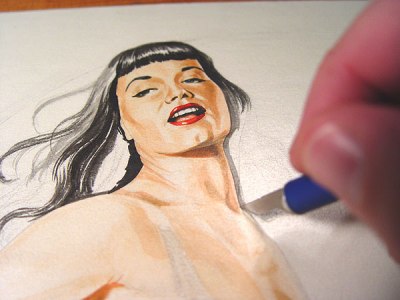
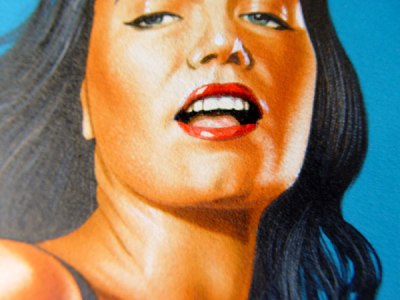
With the problem areas out of the way, it is time for the step that I think really gives the painting its life. Using a common typewriter eraser pencil, I begin removing paint from the highlight areas of my art.
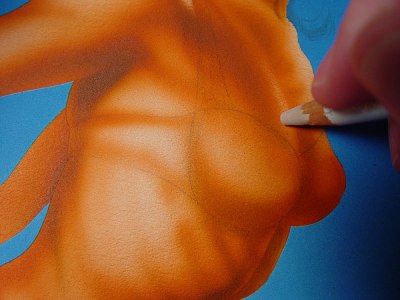
Since the sprayed pigment sits on the surface of the board without soaking in, it is fairly easy to remove it by erasing. The typewriter eraser is more abrasive than a normal pencil's eraser or a kneaded eraser, so I work slowly to blend the highlights into the surrounding color. The abrasiveness comes in especially handy for grinding off the brightest highlights.
By using a curved stroke with the bomb, I was able to create the look of brushed metal. You could use a similar technique with a crosshatched pattern to mimic fabric. Your options are only limited by your imagination! To create soft highlights over a large area I rub with a kneaded eraser.
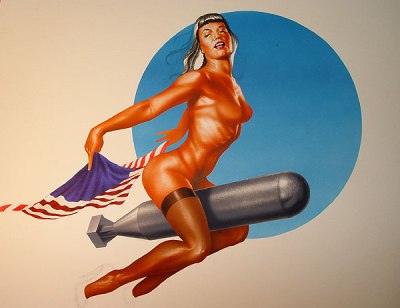
Now, with the painting nearing completion, I finish up the last details. I originally considered painting the underwear by hand to create a lace effect, but I've changed my mind and am now going with a solid fabric look. I cut some new frisket and quickly spray these areas, black along with her shoes. The remaining details I apply by hand, including the hair, stars on the flag, and deepening some shadow areas.
That's about it for this painting! I'll set it aside for a few days, so I can look at it later with "fresh eyes", and may make some slight alterations if I think it needs anything more. Other than that, she's ready to auction!


